15 DIY Flower Crochet Chart Diagrams
Before I get started with the project of the day let me share something with you girls, from the very beginning of this platform we are receiving very positive feedback from our fellow subscribers which I guess is something very positive and encouraging to boost up our morale. Here we have collected a number of crochet inspirations, and in the beginning we have provided a whole map chart which would guide you throughout the crocheting. I am more than sure you people are going to love the way we have exploited different shades for knitting in these 15 DIY crochet flower chart diagrams and symbols.
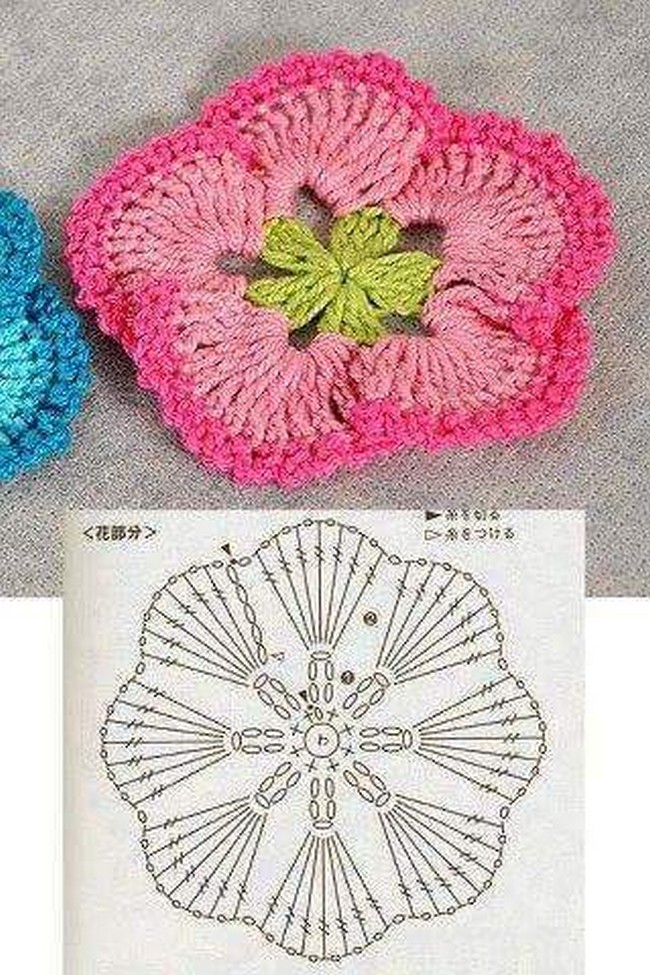
This is the very first pick of the day where we have presented a simple flower or brooch that could be used as an additional embellishment or as a mere motif on several knitting projects. Not only the project is here but we have also unleashed the whole crocheting plan right here below the flower where even the beginners can find out the whole procedure that exactly which stitch pattern is followed here. To me this is pretty easy for the beginners as well as only single stitch pattern is used throughout the entire knitted flower.
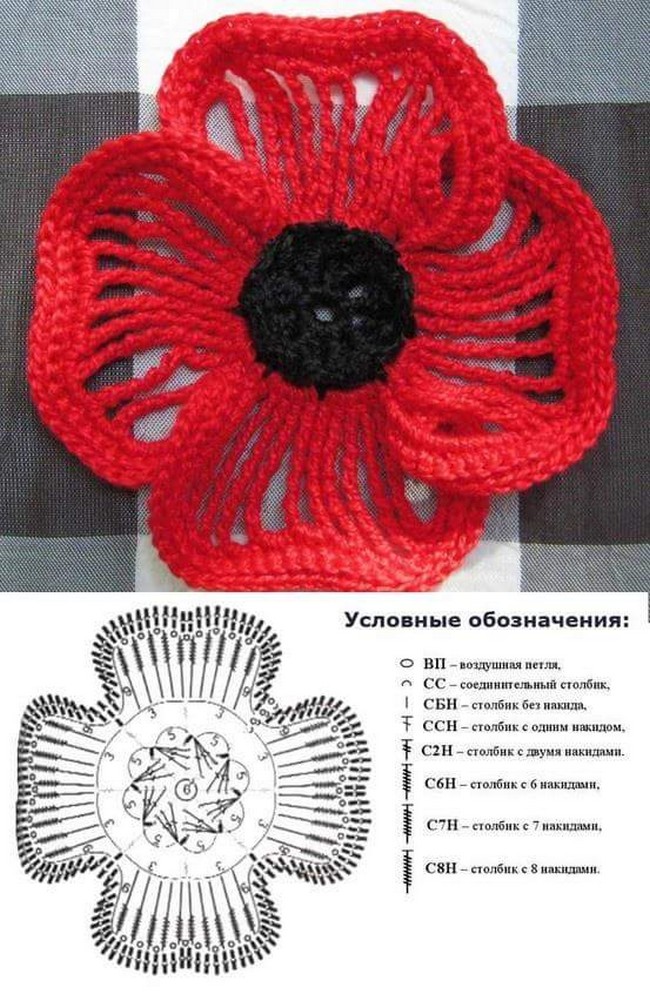
Red and black, both are kind of shocking shades which are equally good when used as the base shade because they are the perfect enhancers of shade and color. All the other colors used on them would be pretty prominent as the base color is so strong and shocking. But we basically crocheted this beautiful rose obviously as a supportive crocheted brooch that could be attached to various bed spreads, bathroom sets and self made rugs. The red and black put together really create a very impressive and soothing feeling so you can try this combination on various shades opening new horizons of choice of threads for you guys.
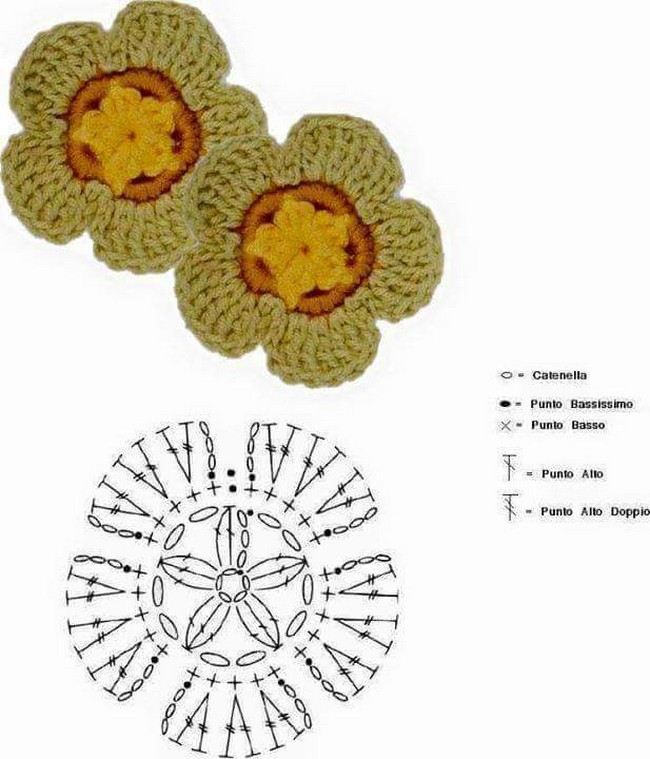
This tiny flower is kept in one single thread deliberately. That is why we have confined the size of the flower too because if made too big in one single shade, this wouldn’t have looked that better as it does right now. Such tiny brooches or flowers are ideal to be used on the borders of the bed spreads and some dining table sheets. The middle circle is made by crocheting in circle following the single stitch pattern, and a couple of double stitches are hooked in the extensions of the crocheted flower.

Now this one could be a bit confusing for the beginners, that is why we have tried to elaborate the entire process step by step where we have maintained to present each different part separately from where you can grab the exact idea how to execute this multi colored flower. The inner round shape crocheted in green is made first, you have to do repeated one stitch crochet in making it, once you are done with it the base or the white petals must be prepared for it. You can slightly amend the color selection here but this one given here is an ideal one.

How about this pink rose crochet? I guess this is very fascinating and would enhance the beauty of the object wherever you attach this. The centre dotted portion is again made with the single stitch pattern where you have to slightly twist the crochet hook and then move to the next stitch, while the rest of the build ups are apparently simple and easy. I don’t think this is going to be any messy for the ones who are familiar with only the basics of the knitting so this must be given a try.

While here you have to be focused and try to grasp the basic technique that is used in making this crochet project. Actually the middle circle is made separately, and the petals or the extensions are attached later with a bent inward single stitch and then the rest of the layers are then interconnected. To give it a perfectly natural look we have made the leaves with the dark green shade which is easily available, in the horizontal layers single stitch pattern is applied, while in the rounding ones we have used tilted double stitch pattern to give it a thicker look.

Look at this beautiful crocheted creation, basically three shades are used here. Although all of them are different in color and tones, but when put together they offer a very reasonable look that would be ideal for the bathroom sets especially where some dark ceramic tiles are used. Look at the stitching scheme right below the flower, each and every step is elaborated in very detailed manner. And this is going to be so damn handy for all the learned fellow crochet crafters. Make some amendments in the color scheme to give it a brighter look.
If anyone out there is the beginner from the scrap then I would recommend her to stay back and just go through these DIY project to just grasp the basic idea, because these projects are meant for those who are already into the crocheting stuff and they are also familiar with the basic crochet work. For those amateur crochet crafters we have plans to bring some projects in the near future where they would be taught from zero, how to hold the crochet hook, what are the stitch patterns basic and advanced, and how this all really goes on.

Green and light red, both the crochet thread shades are very reasonable and ideal for making these crochet flowers. In making these crochet flowers we mostly focus and emphasize on rendering them a most natural look, that is why we opt some of the most natural shades which really help us a lot in this regard. As far as the stitching scheme is concerned, again the middle circle is single crocheted in a circle, and then the extensions are made with the double stitch pattern and so on. All plan is given below that from where to tilt, and from where to reverse the crochet.

Pardon me with the language as this is not meant for the English speakers and readers, as these maps or charts are just meant to present the basic idea here. And I don’t think there could be any hazards for digesting the plans unless you are not a lay man or woman for crocheting. As far as the color is concerned this frosty light blue shade is so soothing to the eyes. Try attaching it to the seasonal sweaters or the bed spreads or whatever you have lined up in your next crochet project.
These knitted crochet flowers are so full of colors and hence full of life. I think the color selection play a vital role in your all crochet projects. This depends on what exactly you are going to create and for what certain event or the purpose. As these colorful brooches were meant to be attached to the bed spreads. So we have also used these additional silken stripes to make the middle layers. While the rest of the extensions are all crocheted and the detailed plan of them is elaborated in the diagram right below the said project. I don’t think such an awesome project should be denied your appreciation and consideration.

And here comes something a bit tricky that could be very confusing even for the mentors as well. Yellow and dark brown shades are put together probably to make it look like the sun flower. So this is a very genius color combination. Now come towards the diagram or the stitch pattern plan, from the centre or the middle it remains simple but as we get out of the centre this gets trickier and harder. Each inner extension is connected with a single stitch and then later on the frills are twisted inward out with a double and sometimes triple stitch.

Do you guys remember the jelly or star fish? This one is probably inspired form that creature. But while knitting this one you strictly have to stick to the plan, a round single stitch in the middle, then a cross stitch pattern all around, then a binding or connecting stitch for each separate prong, and then the whole scheme is displayed in front of you ladies so be focused and do it with extreme care. Also grab the idea that on which stitch you have to use the red and on which the white one.
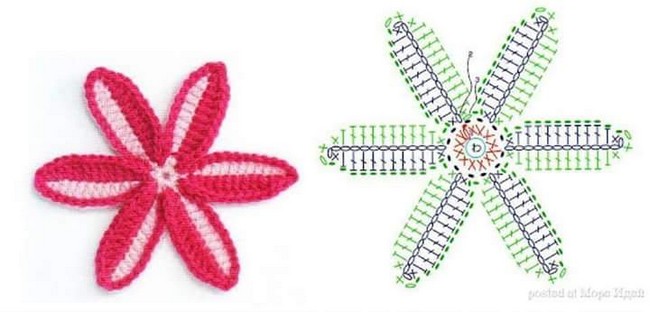
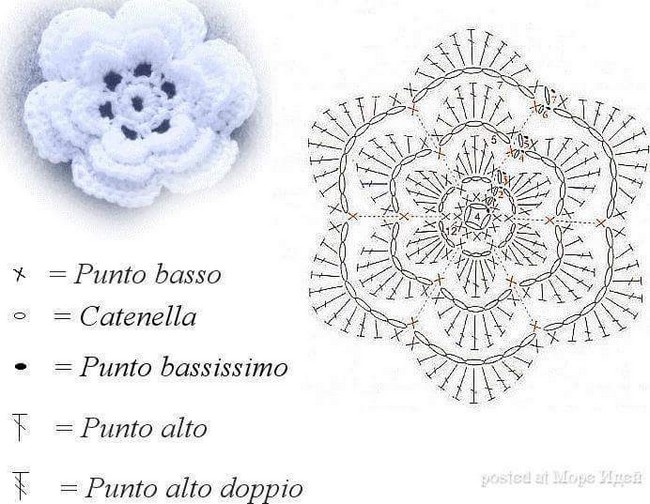
This is again an apparently simple looking crocheted glower, but this is basically a three layered knitted flower made with single thread. The selection of one single thread has literally contributed to the ease of the project otherwise this would have become so hard to manage with more than one threads in each layer. There are basically two basic thick stitch patterns, the basic one and the external one, the middle one is literally meant to connect the rest. The thickets stitch or crochet work is displayed on the outer most layer of the flower.
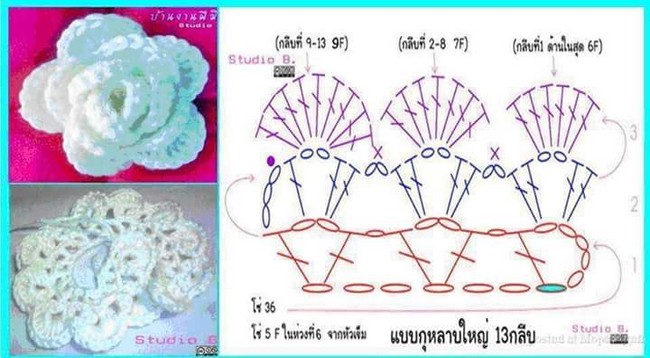
Wow, these colorful flowers are so fascinating. I just wonder where exactly they are going to be put together, no matter where exactly they are used, they would just look awesome as some of the best crochet threads are opted for them and also the stitch pattern is very appropriate. Entire project is elaborated here in detail and step wise that which portion to be crocheted first and which one later. I guess such shocking colors would look awesome if used along the dining table crocheted sheets, they would enhance your appetite and would give a very rejuvenating touch over there.

Look at this whole diagram and let me know that what exactly you grasp from it or what you have learnt so far. We see that a thicker stitch pattern is observed in the beginning and as it expands, it becomes lighter and lighter. Simple interlocking technique is employed here in this specific knitting project. Then a lot of space is left in the second last layer. This is done to give it a thicker look from the base and then the lighter on the ends. This rose pattern would be ideal for bathroom sets that we have displayed in some of the earlier articles.

We have tried our level best to bring you some crochet projects that are multi dimensional in nature and they have got such an appearance that they could be used in various projects as some additional embellishments or the extensions. The diagrams given along each crochet knitting projects are presented to add up to your ease. These diagrams can be understood by the ones who are familiar with the basics of the crochet work. So the lay women are advised to stay tuned and wait for the DIY projects in near future that would be elaborated from the start.
